


If you have any questions or comments feel free to email me at sanmar63 at gmail dot com
I hope you enjoy the the new look the trim will provide!
Celica Supra Seat Back Trim Install
|
| Remove the new trim from package and cut a 5 ft section. Then lightly preheat with a hair dryer on medium to soften the vinyl. Do one foot at a time, heating lightly. The goal here is to make the vinyl a little more pliable, not to melt the glue or damage the finish. | |
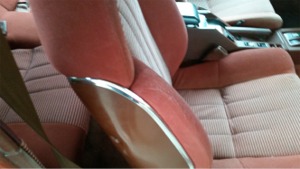
| Remove seat back. Just 4 screws on the passenger side. The driver side will require removal of the knobs (held by C- clip) and unplug the airlines when the seat back is lifted off the seat. | |
| Place the seat back on something soft to protect the finish side. | |
|
Remove existing trim which is held in by small staples. Once removed, use a small screw driver or putty knife under the trim to raise the ”head” of the staple so you can extract them with pliers but don't remove until you're ready to reinsert them in the new trim. It's easier to grab the tip of staple this way. If you have a staple gun with 1/4" staples you can use that instead of reusing the old ones. DO NOT USE LONG STAPLES. |
|
Retrieve new trim, use your thumb or a blunt object to run down the trim seam. This will open it up for easier installation. |
|
Start on the console side of the seat. Use a hair dryer to soften a one foot area of the trim. Insert the trim over the seat back edge. As you approach the corner, use a hair dryer to further soften the trim enough to make the turn. Apply heat on the inside area of the seat back to avoid crinkling the front finish. DO NOT OVERHEAT, it doesn't require a lot of heat. You can add a series of small slits to the inside edge to aid bending if desired. |
|
You can add a series of small slits to the inside edge to aid bending if desired or if you have any puckering. |
|
Reinsert a couple of the staples with the end of flat nosed pliers flat nosed pair of pliers to reinsert. You can easily push the staples trough the trim and into the seat back with flat pliers by grabing the edge of the staple. Fold a paper towel multiple times and use it to protect the seat back/trim from damage and press the staple the rest of the way in with the pliers on either side. I had no markings on the trim or seat back using this method. This will hold the 1st corner in place while you proceed to the next corner. |
| Once the trim is installed you can insert the remainder of the staples and use a little heat all around the trim from the inside edge to activate the adhesive. | |
|
That's it! Reinstall and enjoy the improvement. I pulled the seats and dyed them since I already had the backs off. |
If you have any questions or comments feel free to email me at sanmar63 at gmail dot com I hope you enjoy the the new look the trim will provide! |
|